Probably everyone with OpenStack hands-on experience would agree that sometimes it could be hard and frustrating to install it and test it. Especially if you do not own a small Data Center or the proper physical infrastructure to support its installation needs… However, wouldn’t it be great to use a public cloud provider and its infrastructure to experiment and create POC environments? In this article, I will try to provide the basic steps of how to spin up an OpenStack POC environment on AWS and the things you should modify in order to get OpenStack up and running probably on every cloud provider. So, where to start? The very beginning of course!
Understanding OpenStack
OpenStack is an IaaS solution built up using several open-source projects. However, each project is being developed independently. That means the projects can be used either within or outside OpenStack’s context (e.g. Swift project which provides object storage is a good use case). End-users have the ability to manage — in a cloud-fashion — the resources OpenStack exposes. Now, understanding how OpenStack works in the background (just some basic concepts) would greatly help us during the installation process so let’s do a quick introduction.
OpenStack is a distributed system and being such, it has a Control and Data Plane. Quoting from OpenStack’s architecture requirements docs.
When designing an OpenStack cloud, it is important to consider the needs dictated by the Service Level Agreement (SLA) . This includes the core services required to maintain availability of running Compute service instances, networks, storage, and additional services running on top of those resources. These services are often referred to as the Data Plane services and are generally expected to be available all the time. The remaining services, responsible for creating, read, update and delete (CRUD) operations, metering, monitoring, and so on, are often referred to as the Control Plane. The SLA is likely to dictate a lower uptime requirement for these services.
There are many ways and methods to install and maintain OpenStack. However, the so-called minimal deployment always complies of the following services:
- Identity service
- Image service
- Compute service
- Networking service
Those are the bare minimum services we need in order to get OpenStack up and running. Let us now have a look at what each service/project does and try to understand why we need it.
Identity Service
OpenStack uses APIs heavily. Each service has its own API endpoint and it needs to communicate with other services (and APIs) to function properly. Hence, we need a method for each service/user to authenticate and authorize itself against all the other OpenStack services. Latter is being realized with Keystone — one of the most important services in OpenStack — which also provides RBAC capabilities to our environment. Quoting from Keystone’s project page:
Keystone is an OpenStack service that provides API client authentication, service discovery, and distributed multi-tenant authorization by implementing OpenStack’s Identity API .
That means each attempt from a service or user to communicate with another OpenStack service should first be communicated with Keystone. It is Keystone’s responsibility to handle any AAA (Authentication, Authorization, Accounting) attempt against any OpenStack resources.
Where all this information about the available APIs and services is being kept? This is where a database comes into play (usually a MariaDB database is being deployed). Each service has its own table and each time we’re creating an endpoint we’re actually creating a new database entry. Creating a database table is a prerequisite step for each service we want to install.
e.g. The first step for installing Keystone would be (from OpenStack’s installation page):
Before you install and configure the Identity service, you must create a database.
- _Use the database access client to connect to the database server as the root user:
__$ mysql -u root -p_ - Create the keystone database:
MariaDB [(none)]> CREATE DATABASE keystone - Grant proper access to the keystone database:
MariaDB [(none)]> GRANT ALL PRIVILEGES ON keystone.* TO ‘keystone’@’localhost’ \IDENTIFIED BY ‘KEYSTONE_DBPASS’; MariaDB [(none)]> GRANT ALL PRIVILEGES ON keystone.* TO ‘keystone’@’%’ \IDENTIFIED BY ‘KEYSTONE_DBPASS’;(Replace KEYSTONE_DBPASS with a suitable password.) - Exit the database access client.
… and usually, the next step is to create the service user and the endpoints, e.g. for nova
_openstack endpoint create –region RegionOne \ compute public_ [_http://controller:8774/v2.1_](http://controller:8774/v2.1)
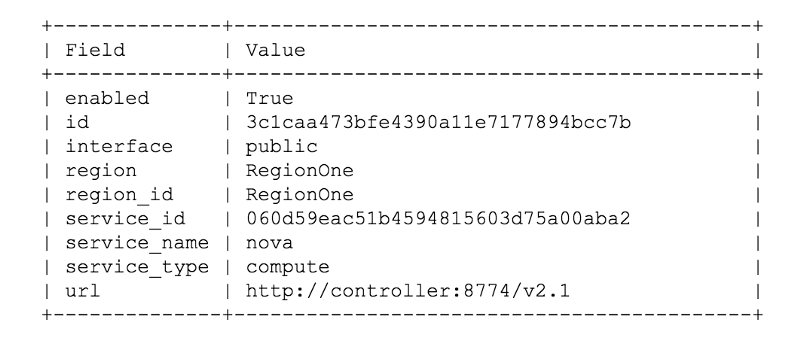
It is worth mentioning here that there are three different endpoint types in OpenStack:
Public: We can use public endpoints to give external users access to our services/resources.
Admin: Administrators can use this endpoint to manage OpenStack’s infrastructure and services.
Internal: Services use that endpoint for internal communication.
Image service
Glance is OpenStack’s image service and it is the service we’re using for making images available to our end users. Each time we want to make an image available we just need to upload it to Glance.
Glance image services include discovering, registering, and retrieving virtual machine images. Glance has a RESTful API that allows querying of VM image metadata as well as retrieval of the actual image. VM images made available through Glance can be stored in a variety of locations from simple filesystems to object-storage systems like the OpenStack Swift project.
Compute service
Nova is the service which abstracts a server’s underlying resources and allows us to use its compute resources — including bare metal, virtual machines, and containers.
Networking service
OpenStack’s networking is based on Neutron which is a Software-Defined Networking service and usually one of the most complex services to setup. The complexity lies in the fact that OpenStack’s networking highly depends on the existing physical network installation — and networking itself can sometimes be quite complex. When it comes to deploy networking, we could either use:
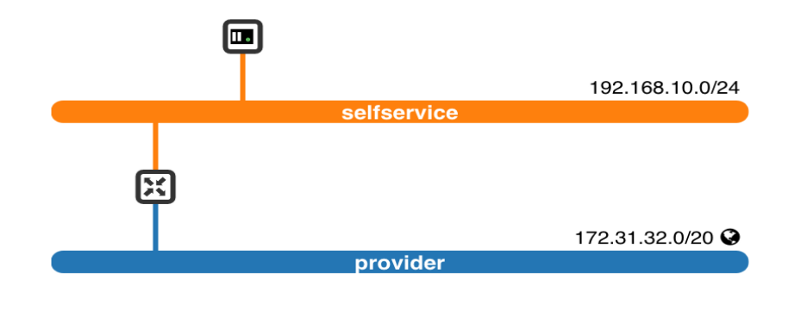
Provider Networks: No-virtual networks. VMs are directly connected to the underlying physical network. They are getting IPs from the existing external network infrastructure.

Self-service Networks: Provide the ability to create overlay virtual networks using e.g. VXLAN tunnels. We need to attach floating IPs to our VMs and services in order to access them from the public world.
An excellent article about OpenStack’s different networking options can be found here.
Installing OpenStack, the hard way, on AWS:
Let’s see what kind of resources we will be needing in order to get started with the installation:
VPC — Networking
1 VPC with 2 subnets:
e.g.
Subnet A: 172.31.32.0/24
Subnet B: 173.31.32.0/24
1 reserved floating IP
We will be needing to access OpenStack Dashboard and APIs so make sure you reserve a floating IP. We will use that IP during the public API endpoints setup.
Since this is a testing environment make sure to wide open the permissions on your ACL so that any kind of network traffic between ec2 instances is allowed.
Double-check your Routing Table and make sure that SubnetB has access to the internet. We’re trying to emulate a production environment so it shouldn’t be necessary for Subnet A to have access to the internet.
EC2 Resources
For the minimal deployment we need to create the following resources:
1 x Controller Node:
(The Controller hosts most of the core OpenStack services)
Flavour: t2.xlarge
Disk: 40Gb
Network Interfaces: 3
eth0: Management & Overlay Network — Subnet A
eth1: Provider Network — Subnet B
( OpenStack has a special configuration for this interface and it does not use an IP → https://docs.openstack.org/install-guide/environment-networking-controller.html )
eth2: Public internet access — Subnet B
(We will be using this interface to route traffic from eth1 and provide access to the Internet)
1 x Compute Node:
Flavour: t2.xlarge
Disk: 40Gb
Network Interfaces: 2
eth0: Management & Overlay Network — Subnet A
eth1: Provider Network — Subnet B
( OpenStack has a special configuration for this interface and it does not use an IP → https://docs.openstack.org/install-guide/environment-networking-controller.html )
Additional services (Object storage etc.) require:
1 x Block Storage Node:
Flavour: t2.medium
Disk1 (Root): 8Gb
Disk2: 40Gb
Network Interfaces: 2
eth0: Management & Overlay Network — Subnet A
2 x Object Storage Nodes:
Flavour: t2.medium
Disk1 (Root): 8Gb
Disk2: 20Gb
Disk3: 20Gb
Network Interfaces: 2
eth0: Management & Overlay Network — Subnet A
OpenStack Release:
We will be installing OpenStack Rocky — https://docs.openstack.org/rocky/install/ but the guide should work with all other OpenStack releases.
Operating System:
Centos7 — https://docs.openstack.org/install-guide/environment-packages-rdo.html
But feel free to choose the Operating System you prefer. You will be able to find instructions in the OpenStack documentation for the following OSes:
- Ubuntu
- openSUSE and SUSE Linux Enterprise
- Red Hat Enterprise Linux and CentOS
Networking Option:
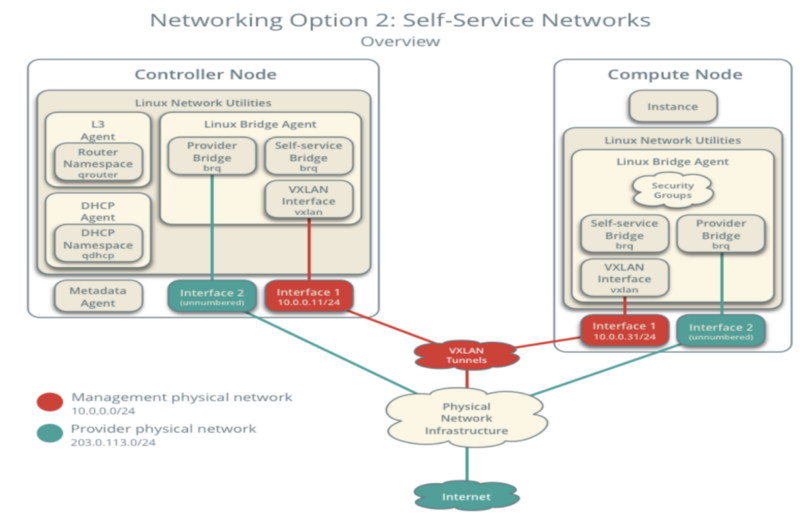
Self-Service Networks with Linux-bridges : https://docs.openstack.org/neutron/rocky/install/overview.html#network2
Things to consider:
Virtualization: EC2 instances are VMs so they are already running on top of a virtualized layer. The bad news is that as of now AWS is not yet supporting nested virtualization. Hence, we will be using QEMU instead of KVM in order to fully emulate a system. It is going to be slower but absolutely fine for POC scenarios. Otherwise, if your pocket can handle it you might want to experiment with AWS Bare Metal instances and have a hypervisor of your choice installed!
Networking: Installing OpenStack requires access to the networking equipment in order to do some modifications/optimizations. However, we will now be using AWS network which by default has some limitations and is not allowing traffic from random VMs and IPs flowing within its network. If this was possible we could start questioning the security levels of this service, but we can’t. Therefore, we will have to apply some workarounds. This is why a separate OpenStack Networking on AWS section exists on this article.
Installation Steps:
For the OpenStack POC installation on AWS we will be following the steps described in the following guide:
Install OpenStack services
_The installation of individual OpenStack services is covered in the Project Installation Guides that are available at…_docs.openstack.org
WARNING!
OpenStack is a community-backed open source project. i.e. documentation is not always the best way to install services since it is sometimes outdated. Always double-check that the APIs and the endpoints used are the APIs you have previously installed.
e.g. if you installed nova API v2.1 make sure you use that version and not v1. Even if mentioned otherwise in the official documentation!
OpenStack Networking on AWS

The management network is using eth0 (green one) ifaces and it is the network OpenStack uses for its internal communication needs. OpenStack services use IPs from this subnet to talk to each other. (On a real-world scenario Internet access is not mandatory for this network). The same network is used to build up the overlay networks. We have several options on which encapsulation technology to use in order to build up the overlay network. In our scenario we used VXLAN. Each time we are creating a new self-service (virtualized internal) network a new VXLAN is being created on the network node. We will not see any connectivity issues among machines that belong to the same overlay network since the traffic is encapsulated and AWS sees what it need to see (a known MAC and IP address). However, our instances will not be able to access the external world. Let’s try to understand why by having a look at the picture below:
The self-service network is an overlay network (uses eth0) and all traffic generated within that network uses a VXLAN tunnel. However, we are being blocked when an instance tries to communicate with the external world (provider network here). This happens because the network traffic needs to pass from:
- The vrouter (implemented using namespaces)
- eth1 which is an interface configured without an IP
- Subnet’s gateway
- and get back!
Here we need to remember that OpenStack has a special configuration for this interface and it does not use an IP → https://docs.openstack.org/install-guide/environment-networking-controller.html .
Let’s have a look at the vrouter’s routing table:

It is clear that if we want to communicate with the external world, we need to send our traffic through the subnet’s gateway. However, this is an AWS managed gateway and it is expecting a specific IP and MAC address. Since our packets have an IP (external gateway IP) different than the one AWS expects our traffic is getting blocked. Another indicator that something is wrong is the ARP table. An arp -n within the vrouter namespace reveals that the vrouter cannot detect the MAC address of the provider network (AWS network) gateway. You will see “ Incomplete “ against the subnet’s gateway entry in the table. What we need to do is change the vrouter’s MAC and IP to the values AWS subnet expects and assign the eth1 MAC address to a random one.
The problem is well described here as well . However, the suggested solution did not work for me out of the box. Changing the vrouter’s MAC address was not possible through the CLI (got an already in use error) so I had to directly modify Neutron’s SQL database. Moreover, changing the default MAC address of the NIC on AWS leads to connectivity issues and more modifications were required in order to make this work. You could try this out yourself. Spin up a VM with one NIC and ssh to it. Now change its default MAC address and try connecting to it. You are locked out 🙂 .
Generally, what we’re trying to do here is to solve 2 problems. The first one is Layer 2 connectivity and the second one is Layer 3 connectivity.
For Layer2:
We’re using an AWS LAN. Hence, we need to make sure that ARP works fine. This is the reason for modifying the vrouter’s external gateway port MAC address.
For Layer3:
We need to ensure that our traffic is being routed properly in the network and can bypass AWS restrictions. This is why we added an additional NIC to the controller (eth2). We will use that interface to route all traffic from eth1. However, since AWS network expects to see packets with a specific MAC:IP we need to NAT eth2 traffic flowing towards AWS. Following command should do the trick:
_iptables -t nat -A POSTROUTING -o eth2 -j MASQUERADE_
We are now somehow familiar with how packets flow within OpenStack and AWS network as well as which problems we’re trying to tackle. Hence, let’s describe the steps we need to follow in order to fix OpenStack’s networking on AWS (and any other cloud environment which has similar networking limitations).
Follow the steps below:
- ssh to the Network Node (or the Controller if your networking service runs there).
- Create a file which contains the following (here why):
file:
/etc/cloud/cloud.cfg.d/99-custom-networking.cfg
content:
network: {config: disabled} - Write down eth1 default MAC address.
- Change eth1 default MAC address (be creative here and keep it simple! macchanger is great but it is really easy to change the MAC on CentOS ).
- ssh to the machine and double check that eth1 MAC has now changed.
netron router-gateway-set <router_name> <external_network_name> -fixed-ip ip_address=<aws_assigned_eth2_private_ip>- It is now time to configure the vrouter’s external gateway interface port MAC address
>mysql -u root -p
>use neutron;
>show tables;
>select * from `ports`;
> Look for the vrouter’s external gateway port
> Let’s change the vrouter’s MAC with eth1 MAC:
UPDATE `ports` SET `mac_address` = “<eth1_mac>” where `mac_address`=”<router_external_gateway_port_mac>”;
>exit; - Make sure that the router’s gateway port MAC has changed (either use cli or login to the dashboard).
- Check that ARP now works fine from the vrouter’s namespace.
ip netns exec qrouter-a3da6290-eb4f-444c-9abc-ed75382c2484 arp -n - You should not see any incomplete entries but the AWS subnet’s gateway MAC address.
- Login to AWS console and disable source/dest check on interface eth2 . We are going to apply NAT on this interface so we have to disable this check.
- Apply NAT:
iptables -t nat -A POSTROUTING -o eth2 -j MASQUERADE - You should now be able to communicate with the external world:
ip netns exec qrouter-a3da6290-eb4f-444c-9abc-ed75382c2484 ping 8.8.8.8
We’re now ready! Our internal instances should be able to reach the internet! Have fun playing with OpenStack!