I am setting the context before explaining the method I am using. If you just need the solution scroll down to “Preparing our local environment” section.
What is pi-hole?
Pi-hole is a Linux network-level advertisement and Internet tracker blocking application which acts as a DNS sinkhole and optionally a DHCP server, intended for use on a private network pito secure your home network (definition). That means that if you use it as your primary DNS server in your home network you will be able to block ads for all your devices in your home network, without having to do any modifications. Benefits?
- All the devices in your network are protected
- Network performance is improved (advertisements are blocked before they are downloaded)
- In-app advertisements are blocked
- You can now have statistics for your network usage!
If you want to learn more go to the pi-hole official page here.
What do I need?
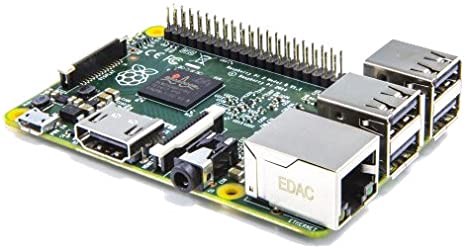
- A Raspberry-Pi (preferably an old model like 2b)
- An ethernet cable
- A good quality USB power supply that can provide the current you need (a 5V @ 2A supply should be good enough)
- An SD card — 16 or 32 GB class 10 card, do not go crazy…
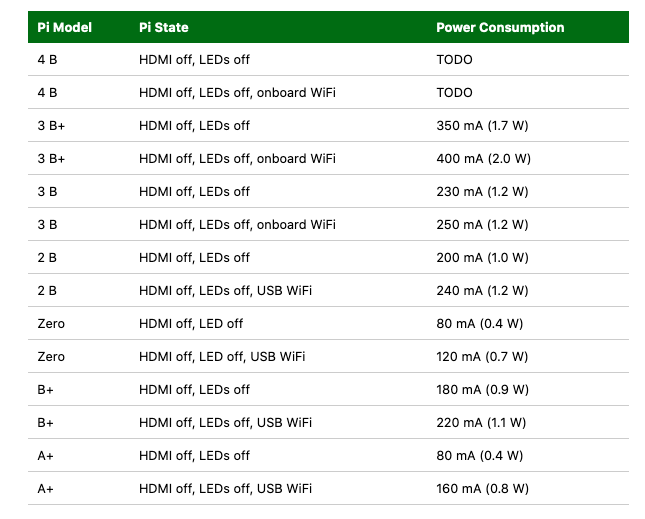
Now, there are various ways to install pi-hole but my preferred way is to use an older version of raspberry-pi for this job (I am going to use a raspberry pi-2b). The reason behind choosing an old raspberry is that I want a low-cost, low-maintenance, low-spec system that I will leave running 24/7 … forever! Now, older models have lower power consumption since more hardware and fancy stuff like WiFi means more power, but we just do not need more! Therefore, please “think green” before setting up a “small beast pc” running an application like pi-hole (and you will also save a couple of bucks)…
Background
The most common problem with RPIs is that eventually even the most expensive SD card will fail and you will have to replace it. Now, if you’re too busy or too lazy to setup the new card you will have to think of a solution to this problem. Yes, you can take backups, you can create image clones from your SD card etc. However, I did not like any of these solutions since they were too old-fashioned and not flexible. Most important, they are not allowing experimentation and raspberry was built to enable experimentation! As such, I wanted an easy and deterministic way to experiment with new images, destroy them, modify them and so on and so forth.
As a DevOps engineer creating images and “baking” packages, applications and configuration files in them is a really common problem and it has been resolved using various methods. Usually, I like using Packer to generate new images so I though it’d be nice to use Packer to generate images for my raspberry pi as well. The benefits are that everything is going to be “as a code”, I will not have to remember anything since all of my configuration is going to be version controlled and I will be able to share this with others.
Now, RPI is ARM based and usually our PCs are x86 based. That means that we will either have to emulate a RPi OS or use a “chroot” approach. Before re-inventing the wheel I decided to do some research on this… and then I found this repo! It is exactly what I was looking for and it is optimized for raspberry pi, so why not contributing to an existing solution for this? Let’s do it!
Preparing our local environment
We will need to install docker if you do not have it already. Check here if you need to install it. A docker image will be used to host our chroot environment and build the RPI images. My local setup was:
macOS Catalina — 10.15.7
Docker desktop — 3.1.0 (Engine 20.10.12)
We can now start preparing the image and install pi-hole.
Installing pi-hole
- Clone this repo -> https://github.com/gtarnaras/packer-builder-arm-image . (This repo is a fork and I have extended and updated it to my needs. Will push it back to main once I find some time!)
- We now have to create the docker image that we’ll use to build the RPI image. Run:
docker build -t packer-builder-arm .
- Now run the command below to install and configure pi-hole:
docker run \
    --rm \
    --privileged \
    -v ${PWD}:/build:ro \
    -v ${PWD}/packer\_cache:/build/packer\_cache \
    -v ${PWD}/output-arm-image:/build/output-arm-image \
    -e PACKER\_CACHE\_DIR=/build/packer\_cache \
    packer-builder-arm build samples/pihole/raspios\_pihole.json
- at the end of this process you will find the image under ${PWD}/output-arm-image . You might want to rename it to image.img to remember that this is actually an OS image.
- pi-hole is installed using this file: samples/pihole/raspios_pihole.json and we’re also installing all the other packages we need/want. It is worth mentioning that we’re also disabling the leds and the HDMI port to consume less energy. On top of that we’re also installing log2ram to reduce the SD card usage (less writes = more life for our sd-card). Once the installation is done we need to burn the image to the sd card.
Burning the image to the sd-card
- We could use dd for this job, but I usually prefer using this tool. Up to you but please be extra careful before using dd since you can easily destroy the wrong disk.
- Once the SD card is prepared just insert it into your RPI and let it boot (and you’re done!). It will need a couple of minutes to initialize. The only blinking lights you should see are the lights coming from the ethernet port. Remember, we have disabled all the activity leds.
Setting Pi-Hole as our primary DNS
- It is time to modify our home router since our RPI has to have a static IP. In the example above we’re using 192.168.1.138 so you need to asing this IP to your raspberry. I assume you know how to do this… if not search for “How to Set Static IP Addresses On Your Router” and you should be able to find instructions for your router.
- Add this IP (192.168.1.138) as the primary DNS for your router. This way your router would first contact your raspberry to get DNS info.
- You now have a deterministing method to deploy pi-hole the way you like it and you can also share it with others!